![]()
DPS923 & MAP523
Mobile App Development for iOS
Notes Topics Weekly Resources Graded work Professor Code examplesNavigation controller essentials
Our apps will use navigation controllers to enable a multi-scene experience.
From the reference document:
A navigation controller is a container view controller that manages one or more child view controllers in a navigation interface. In this type of interface, only one child view controller is visible at a time. Selecting an item in the view controller pushes a new view controller onscreen using an animation, thereby hiding the previous view controller. Tapping the back button in the navigation bar at the top of the interface removes the top view controller, thereby revealing the view controller underneath.
We use a navigation interface to enable ahierarchical organization of data and/or tasks in a workflow.
Learn more
Before continuing, please read the first half of the reference document, from the beginning, down to the end of the section titled Adapting to Different Environments.
All of it. Before continuing. Do it now.
Welcome back.
In-class discussion
Here are some highlights of our in-class discussion and demonstration.
Open the “nav intro” code example (W04a1NavIntro) as you go through this section.
- This is a three-scene app
- Overall, the scenes are managed by a navigation controller
- Each scene is managed by a standard view controller
- The scenes are named First, Next, and Last
- Buttons are used to navigate to the “next” scene, and we use segues instead of actions
- We also pass data from one scene+controller to the next
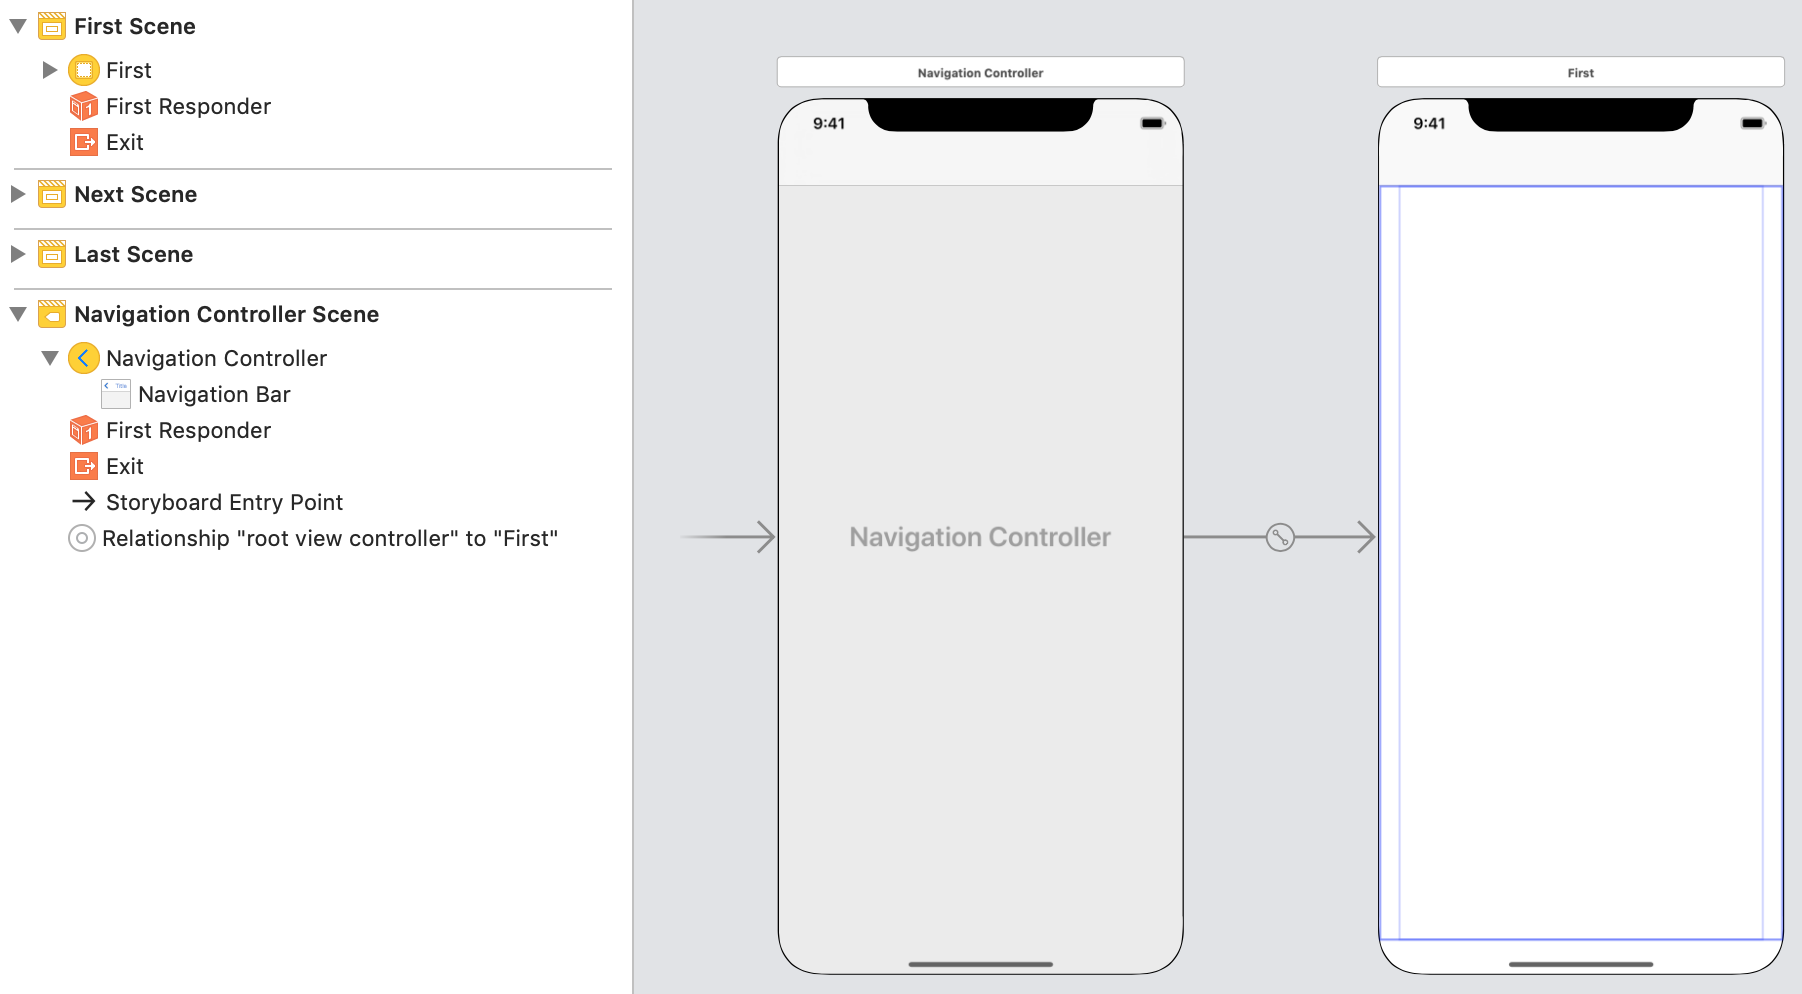
Often (most times), the nav controller is the app’s entry point on a storyboard.
In the image below, it is the arrow that is pointing to the “Navigation Controller”.
You can also see it listed in the left-side document outline / view hierarchy as “Storyboard Entry Point”.
The nav controller is then connected to the first scene.
In the image below, it is the arrow that connects the “Navigation Controller” to the “First” scene.
You can also see it listed in the left-side outline as “Relationship “root view controller” to “First”.
Transition… segue
How do we transition from one scene to the next? Well, there must be something (i.e. a UI object) that triggers the transition.
- In the “nav intro” code example, a simple button does this task
- In other typical apps, selecting an item on a table view does this task
In iOS, a segue object represents a transition. On the storyboard, we create a segue by connecting the trigger object to the destination scene. Here’s how, using a button as a segue trigger:
- Select the button.
- Press-and-hold the keyboard
controlkey. - Click-and-drag from the button, to an open area of the next scene’s view. Release the keyboard key and the pointer.
- A list of choices appears. Choose “Show” under the “Action Segue” portion of the list. A line appears, connecting the two scenes together - this is the segue object.
- Select the segue object. In its attributes inspector, set the value of the Identifier item to a text value that makes sense. We recommend that all identifiers start with the word “to”. For example, “toNext”.
Here is a short video clip (which you can view in the Safari browser) that shows this technique to create a segue:

Pass data to the next scene
An often-done task - almost always - is to pass data from one scene to the next in a navigation interface. This ensures that a new controller is intialized with all the data it needs to do its job.
In other programming environments (e.g. React and Angular on web), you have used similar techniques. For example, to pass data to another component in React, we use its
propsfeature. To do the same in Angular, we use a similar feature, or use dependency injection.
How do we pass data from one scene to the next? What is the standard pattern? Ensure that the destination controller has a public variable (property) to hold the data. The data type is up to you. For example:
var incomingData: String!
Then, use that data wherever you need to. For example, in viewDidLoad(), we can show the incoming data in the UI:
result.text = incomingData
Next, in the controller that has the segue trigger, implement the segue(for: sender:) method. Here is the standard coding pattern:
override func prepare(for segue: UIStoryboardSegue, sender: Any?) {

    if segue.identifier == "toNext" {

        // Get a reference to the destination view controller
        let vc = segue.destination as! Next

        // Pass on the data
        vc.incomingData = "Peter McIntyre"
    }
}
Setting the scene “title”
In a navigation interface, it is important to set or configure a “title” for each scene. This task can be done on the storyboard, or programmatically.
For students who are new to iOS programming, we recommend using the storyboard method, because the titles appear immediately on the storyboard.
Set the title of the first scene
This section covers the situation where you must set the title of the first scene that’s managed by a navigation controller.
On the storyboard, select the first scene in the left-side outline. Expand and navigate to locate the “Navigation Item”, and select it. On its attributes inspector, fill in the “Title” item.
Alternatively, in the controller code’s viewDidLoad() method, this code will set the navigation item’s title:
self.navigationItem.title = "First"
// Using "self." is optional and a personal preference
Set the title of other scenes
This section covers the situation where you must set the title of any other scene.
On the storyboard, select the scene. On its attributes inspector, fill in the “Title” item.
Alternatively, in the controller code’s viewDidLoad() method, this code will set the title:
self.title = "First"
// Using "self." is optional and a personal preference