DPS923 & MAP523
Mobile App Development for iOS
Notes Topics Weekly Resources Graded work Professor Code examplesSelect list with data from web API
In this document, you will learn how to use a table view controller as a “select list”. It will display a list of items that were fetched from the network, and enable the user to select one of the items. Upon selection, the selected item will be passed back to the controller that presented the select list.
This is a modal scene, and therefore will use the well-understood “task” pattern (same as for add, edit, detail).
Here’s a brief video demonstration, for Safari browser users:
Why are we doing a select list this way? We already have a picker view, which can be configured to work in the same way. Well, for lists with many items, the picker view UI is frustrating to some users. It has a few other drawbacks when compared to a full-screen table view as well.
Getting started
In our app, we need a way to select an item. What item? Something from a list of search results.
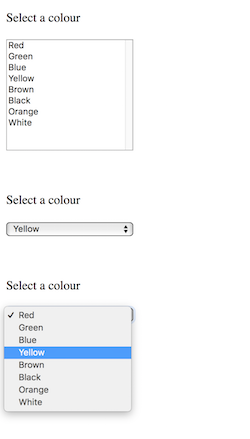
This is a common task in apps. All students will be familar with the use of select and option elements in HTML, and how they are used to make a list of items. On a web page, we typically see this kind of feature as a “list box” or a “dropdown list”, as shown in the web page example, below left.
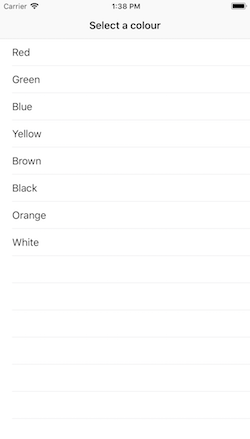
A similar example has been prepared for a list (table view controller) scene in an iOS app, as shown below right.


How can we do this for our app? There are several ideas involved.
- First, we need a list (table view) controller and scene
- It will be a “task” scene, so it will slide up from the bottom (as other task scenes do), as a result of an action segue in the presenting controller
- As a result, it will define a protocol, with a “cancel” method, and a method to handle the selection tap
- It will need data, from somewhere (programmatically created, or from memory, or from a Core Data store, or from the network; maybe by calling a manager method), and data items will render in table view rows
- When a row is tapped/selected, a table view method handler will call a delegate method, and pass back the data represented by the selected row to the presenting controller
- The presenting controller can do whatever it needs to with the passed-back data
The W11a1Select code example in the course’s code repository has the essential info needed to understand and use an item-selection list.
As implied above, we suggest that you first implement the item-selection controller with in-memory data items. (For example, create an array of strings in the controller’s viewDidLoad() method.) When a user taps a row, pass the data back to the presenting controller (in the delegate method call).
How do we handle #5 above (row tap)? We implement another table view delegate method, tableView(_:didSelectRowAt:). You have seen this before in one of the earlier code examples. Here is the logic for the method:
override func tableView(_ tableView: UITableView, didSelectRowAt indexPath: IndexPath) {
    // When the row is tapped, we have the index path value
    // Use it to extract the data-item from the data source
    // (which is the in-memory array of items)
    // Call the delegate's searchTask(_:didSelect:) method,
    // passing the data-item as a parameter
}
How do we handle #6 above (do something with the passed-back data)? Well, in the presenting controller, conform to the select list controller protocol, and implement the searchTask(_:didSelect:) delegate method (and the cancel method). The type of the passed-back data is a string.
Use another data source for the list, for example, a web API
We do not often use a programmatically-generated or statically-coded list of items as the data source. Instead, we do a query of some kind, from a web API or from a Core Data store.
The sample code above doesn’t change much. The only real difference is how the list items are fetched in the viewDidLoad() method.
Other item select list capabilities
Multiple select?
Want to select and pass back multiple items?
Yes, it can be done.
Change the logic:
- Instead of the tap-to-select interaction, add a check mark to each tapped row
- Add a “Save” button to the upper-right nav bar
- Code its logic to choose and return all check marked items
Navigation (drill-down) from select list?
Need to know a bit more about an item on the list?
Yes, it can be done.
This would be useful in a scenario where the text (and perhaps image) wasn’t enough to resolve ambiguity, and you wanted the user to be able to drill down to more info before committing to their selection.
Here’s how to think about this:
- Implement a detail “task” controller that can display lots of info
- On the storyboard, change the table view prototype cell to include a “Detail Disclosure” accessory
- Add the code for that handler to the table view controller
- Finish off the detail “task” coding procedure
