![]()
DPS923 & MAP523
Mobile App Development for iOS
Notes Topics Weekly Resources Graded work Professor Code examplesWeb API request, introduction, synchronous
This document will help you get started with the simplest way to request data from a web API, and display it in your iOS app.
Please note that this content is an introductory treatment only, and is provided only as an example. The content relies on a synchronous request that blocks the user interface. This is bad design for a production app, but it’s good enough for us, because the amount of data is small and the example is simple.
Later (but soon), you will learn how to do it the right way, buy using an asynchronous request to a web API.
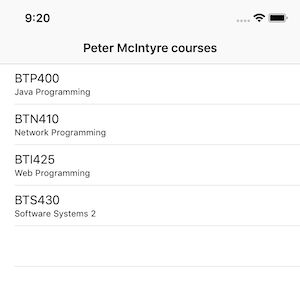
At the end of this document, you will have an iOS app that displays a list of the courses that you have enrolled in during 2019.
What do we need to make this work?
What do we need to make this work? Several tasks:
- A web API (and its URL)
- JSON data on the web API
- Structs (in our app) that describe the data’s shape
- A function that performs the request and returns the data in a ready-to-use object
The sections below take you through each task.
A web API
We need a web API.
Every student has their own GitHub account. Create a new repository, maybe named “dps923data” or “map523data”.
JSON data on the web API
In that repo, create a JSON file, maybe named “mycourses.json”.
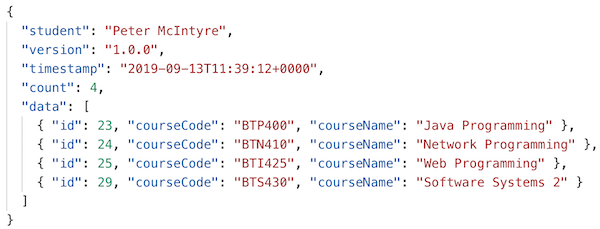
Then, in that file, write JSON that describes a package of data. The top-level object has four properties:
| Possible name | Data type | Purpose |
|---|---|---|
| student | string | YOUR name |
| timestamp | string | The current date-and-time, as an ISO8601 string |
| count | number | The number of course objects that are in this package |
| version | string | The packaging scheme’s version number (e.g. “1.0.0”) |
| data | array of course objects | The course data |
As you can see, “data” is an array of course objects. A course object has three properties:
| Possible name | Data type | Purpose |
|---|---|---|
| id | number | Non-semantic identifier |
| courseCode | string | Course code (e.g. “BTP400”) |
| courseName | string | Course name (e.g. “Java Programming”) |
How many courses should you add? One for each course that you enrolled in during calendar year 2019.
Here’s an example of what you could end up with:
Post it in your GitHub repo.
Test your work
Before continuing, test your work. At this point, you can probably see the file when browsing your GitHub repo. On the viewer page, click/tap the “Raw” button, and your file will appear in the browser as raw data. Copy that URL.
Now, use a different browser to fetch/request that URL.
And, use the Postman app to do the same.
The end result is that you want to make sure that it is publicly posted and available to you.
Structs that describe the data’s shape
Now, work with your iOS app. We will assume that the app has one table view controller (embedded in a navigation controller), and that it loads and runs (showing an empty list) without error.
Next, we must write structs that describe the shape of the data from the web API. Why? So our JSON decoder task can successfully do its job, and convert JSON into a Swift object.
Where do we add the structs? For this learning exercise (and for Assignment 1), add them to the bottom of the table view controller source code file. Below the existing class.
Anything else to know? Yes. The struct must conform to the Codable protocol, to enable the JSON decoder to do its job. For example:
struct StructName: Codable {
    // add struct members here
}
Now, write a struct (maybe named “Course”) that describes the shape of a course object. Its variable (i.e. “property”) names MUST match the names used in the source JSON data.
| Likely name | Data type | Purpose |
|---|---|---|
| id | number | (as above) |
| courseCode | string | |
| courseName | string |
Then, write a struct (maybe named “PackageCourses”) that describes the shape of the package object. As above, the variable names must match the source JSON names.
| Likely name | Data type | Purpose |
|---|---|---|
| student | string | (as above) |
| timestamp | date | |
| count | number | |
| version | string | |
| data | array of course objects |
More content is in this document.
Test your work
In the viewDidLoad() method, create a new “package” object. Use Xcode’s code completion feature to help you do this. The grey highlighted areas are edit targets. Use Tab and Shift+Tab to move among the edit targets.
Here’s how it will start for you:

After setting the values of the top-level package object, start creating new “course” objects in the “data” collection:

Separate each course with a comma, and then begin creating more “course” objects:

Then, to test, and assuming that the name of your “package” object is “package”, add a print(package) statement, and then run the app. The contents of the “package” object should display in the debug console area of Xcode.
You can also use a
dump(package)statement.
For objects (and collections), thedumpcommand often does a better job.
After a successful test, comment out these two lines of code, so that they are inactive.
A function that performs the web API request
At this early point in the course, a full treatment of this topic is beyond our short-term goals. Therefore, your professor has written and provided a function that you can add (copy-paste) to your table view controller code.
Get it from the course’s code example repo.
To use it, you must have the following in your code:
-
A variable, maybe named “coursePackage”, and its data type is an optional PackageCourses (assuming you followed the struct naming guidance above)
-
Another variable, maybe named “url”, URL data type, and its URL initializer string value is the URL to the JSON data file that’s on your GitHub repo. For example:
let url = URL(string: "https://host.example.com/path-to/my-data-file.json")
Then, in viewDidLoad(), call the function:
coursePackage = doRequest(url: url!)
To test this, add a “print” statement.
You’re now ready to use the data in your table view:
- The
coursePackageobject has properties that you can use to configure the table view title etc. - Its
dataproperty has a collection ofCourseobjects that you can use to render data in the list.
Happy coding!