![]()
DPS923 & MAP523
Mobile App Development for iOS
Notes Topics Weekly Resources Graded work Professor Code examplesDPS923 and MAP523 Assignment 1
Assignment 1 gets you started with iOS programming.
Read/skim all of this document before you begin work.
While you are doing the work, if a specific task is not clear, or it seems to require an unreasonable amount of time to complete, contact your professor.
Due Date
Monday, January 27, 2020, at 11:00pm ET
Grade value: 8% of your final course grade
If you wish to submit the assignment before the due date and time, you can do that.
Overview and purpose
Two apps are needed:
- Info about you, the person
- Info about your 2019 and 2020 courses
The first app will display information about you. When launched, the app displays current up-to-date information about you, including your name, photo, program of study, current level of enrolment, and grade point average. The app will also enable you to change some of the displayed information.
The second app will display a list of ten or more courses that you have had in 2019 (winter, summer, fall) and 2020 (winter). The data will come from a web API, and the app will support a small amount of user interaction.
From a programming perspective, working on the app enables you to use a number of user interface elements, work with the on-screen keyboard, and perform simple data round trips and type conversions, and implement the delegation pattern.
Getting started, first app
Create a new iOS app, using the Single View Application template. The name of the app should be “AllAboutMe”.
Follow best practices about project creation. Ask if you are unsure.
Doing the work
Again, as noted above, read/skim the rest of this document before you begin work. That way you know what’s coming.
Photo (head shot)
Before you begin adding objects to the user interface, get a head shot photo of yourself (aka a selfie). Crop and resize it so that it is 300 pixels wide, and 450 pixels tall. It must be a PNG. Use any Mac, Windows, or online program to get this done.
Then, add your photo to your project:
- In the project navigator, click/select the Assets.xassets blue-coloured folder
- In the editor area, a two-panel editor appears; at the bottom of the almost-empty left-side list, click the + (plus sign), and choose “Import…”
- Navigate to the saved photo, and select it
Your photo will now be available in the Utility area’s ”Media Library”, and we will use it soon.
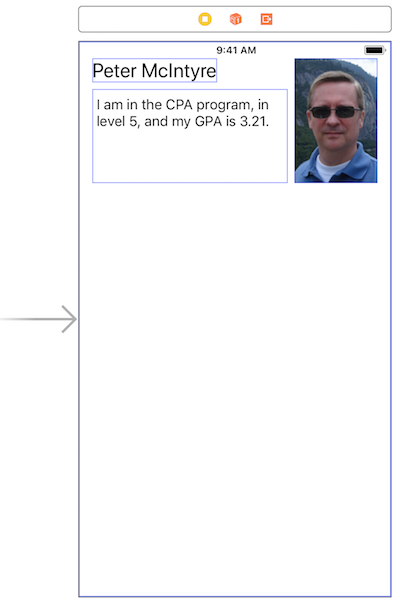
Upper area of the view
In the upper area of the view controller’s view, we will plan for three user interface objects:
- label - UILabel
- text area - UITextView
- image view - UIImageView (which is the container for your photo)
The label will display your name.
The text area will display a string that is built from the settings in the user interface objects in the lower area of the view.
The image view will show your picture, and appears when you drag your photo from the media library to the design surface.
Size the objects to fit. Make the sizes look good. Carefully choose the font size (notice that 15 is way too small).
Tip: Want to see the “bounds rectangles” on a view?
On the Editor menu, choose Canvas > Show Bounds Rectangles.
Each UI element will now be surrounded by its true size.
This should make it a bit easier to learn how to do layout.
Un-check the menu option to remove them from the view.
Maybe your result will look something like the following:
At this point, run your app (Cmd+R), just to verify that you’re making progress.
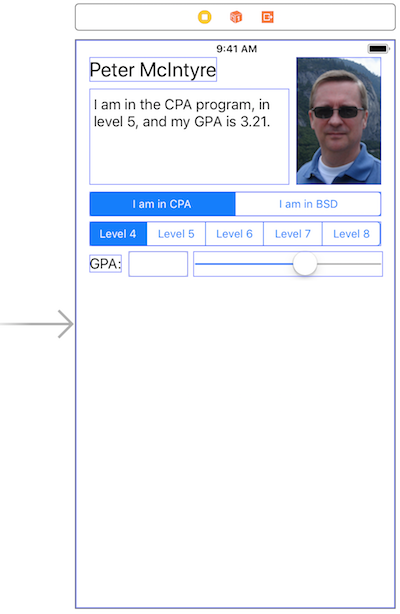
Upper area of the view
In the middle area of the view, there will be five user interface objects:
- two segmented controls - UISegmentedControl
- label - UILabel
- slider - UISlider
- text field - UITextField
Add a segmented control: The top segmented control will display two segments, for two School of SDDS academic programs, CPA and BSD. The initially-selected segment will be YOUR program of study. You can do this configuration in the utility area’s Attributes Inspector.
Add another segmented control: The other segmented control will display five segments, for the academic program levels, 4 through 8. The initially-selected segment will be YOUR level of enrolment.
Add a label: This label is simply descriptive.
Add a slider: The slider will have a minimum of 2.0, and a maximum of 4.0. The initial value will be YOUR current grade point average.
Add a text field: The text field will display the current value of the slider. This value will be set in your view controller code. For best results, set its “Keyboard” to “Numbers and Punctuation”. And, set the “Return Key” to “Done”.
Lay out the user interface objects so that everything looks nice and aligned. Preview the result. You can run your app again, just to make sure that it appears the way you want it to. Here’s an example of what you may have at this point in time:
At this point, run your app (Cmd+R), just to verify that you’re making progress.
Making connections between the user interface and our source code
Writing code for UI objects is a two-step procedure:
- Add outlets and actions to the view controller
- Writing code in the view controller
Add outlets and actions
As you have learned, a storyboard is a resource file that holds the user interface objects, as configured by the Interface Builder editor.
To get programmatic access to the user interface objects, we connect them to properties and methods in the view controller source code file.
Making connections
For the new/beginner iOS app programmer, this next procedure can seem different from other platforms, and challenging to understand. We’ll take you through, step-by-step.
First, add connections, from the following five user interface objects, to the view controller. All will be outlets.
- text view - suggested name resultText
- segmented control (first one) - suggested name programSelector
- segmented control (second one) - suggested name levelSelector
- slider - suggested name gpaSelector
- text field - suggested name gpaInput
What did we just do? We added references to our view controller, so that we can read or write (i.e. get or set) the values of the user interface objects.
Next, we want to add more connections. They will be actions.
- segmented control (first one) - suggested name programChanged, type is UISegmentedControl
- segmented control (second one) - suggested name levelChanged
- slider - suggested name gpaSelectorChanged
- text field - suggested name gpaInputChanged
What did we just do? We added functions (the “action” in the target-action design/coding pattern) to our view controller (the “target”). These functions will be called when the app’s user interacts with a user interface object.
If you want, add a “print” statement to the action method bodies, so that when you run the app (next), it will prove to you that you’re making progress. For example:
print("program changed")
Run your app. Make sure there are no errors.
Add a function to “update the text view”
Earlier, you learned that the text view will be used to display text similar to ”I am in the CPA program, in level 5, and my GPA is 3.21.”
That text will change when a change happens in any of the four input controls (two segmented controls, slider, text field). Therefore, it makes sense to write one function to do this, and simply call the function from the action methods.
We will write a new function that will get the current settings from the controls. Try to write the function yourself, based on the practice that you have done with a Swift playground, and string-to-from-number conversions. If you need some guidance, here is an algorithm:
func updateResultText() {

  // Read the results from the user interface controls...

  // Get and store the program selected

  // Get and store the level selected

  // Get and store the gpa value

  // Assemble the string for the text view

}
Here’s some commentary to get you thinking.
programSelector.selectedSegmentIndex returns an integer. The control has two segments. Segment 0 (zero) represents the CPA program. Segment 1 represents the BSD program. We suggest that you use the Swift ternary conditional operator.
Next, make a string for the level. Segment 0 (zero) represents level 4. Segment 1 represents level 5. And so on. Therefore, the actual level is the selected segment, plus 4.
Then, you need the GPA value. Get it from the slider control. The “value” property of the slider holds its value, and it’s a float type. Therefore, the string format that you’ll want to use is “%1.2f”.
Finally, assemble the string, and set it to the text view control’s “text” property.
Calling the “update the text view” function
When do you call the function?
- When any of the user interface controls change
- When the view loads for the first time
Make that happen.
Next, look at the other code in the view controller. It has a function named viewDidLoad(). The Cocoa runtime calls this function when the view loads for the first time. Therefore, it makes sense to add a statement to the bottom of this method, which will call the “update the text view” function.
Run your app. Make sure there are no errors.
How to set the value of the GPA text field
The slider and text field work together:
- If the slider changes, the text field value should change too
- If the text field value changes, the slider should change too
When the app loads for the first time, the text field is empty. Therefore, in the viewDidLoad() function, set it to the value of the slider. Remember, the text field’s “text” property is a string, and should be formatted to two decimal places.
Next, add code to the gpaSelectorChanged function, which will do the same task.
Finally, add code to the gpaTextChanged function. It will parse (convert) a string into a float value. Use that float value to set the gpaSelector control’s value.
Run your app. Make sure there are no errors.
Make the app work better
At this point in time, the app should work. However, we can make it work better. How?
- Dismiss the keyboard when we’re done with it
- Handle out-of-range or incorrect text field data
- Ensure that the maximum value of CPA levels is 6
- Set initial/load values programmatically
Dismiss the keyboard
Recently, you learned that a text field’s resignFirstResponder() function will dismiss the keyboard. You saw us use that in a button-handling function. Well, in this app, we do not have a button.
Instead, we will use the delegation pattern to handle the on-screen keyboard’s “return” or “Done” button tap. In effect, the text field is delegating the responsibility of handling that event, to some new code that we write.
Handle out-of-range or incorrect text field data
The GPA value ranges from 2.0 to 4.0, and is shown with two decimal places.
If the user enters incorrect data (e.g. non-numeric text or symbols), the string-to-number converter will set the value to 0.0. In that situation, reset it to the minimum GPA value, 2.0.
If the user enters a value lower than 2, then set the value to 2.0.
If the user enters a value higher than 4, then set the value to 4.0.
If the user enters too many decimal places, show the value with two decimal places.
Ensure that the maximum value of CPA levels is 6
If the user taps the CPA segment, and then if the current level is 7 or 8, then change/set the current level to 6. That’s a property of the segmented control named “selectedSegmentIndex”.
In addition to the above, you can disable the level 7 and 8 segments, by using a function (of the segmented control) named “setEnabled()”.
Conversely, if the user taps the BSD segment, then ensure that the level 7 and 8 segments are enabled.
Set initial/load values programmatically
In the viewDidLoad() method, you can set the initial values of the app programmatically, if you wish.
Simply write statements that set the initial values to your own personal situation.
Getting started, second app
Create a new iOS app, using the Single View Application template. The name of the app should be “MyCourses”.
Follow best practices about project creation. Ask if you are unsure.
Doing the work
Again, as noted above, read/skim the rest of this document before you begin work. That way you know what’s coming.
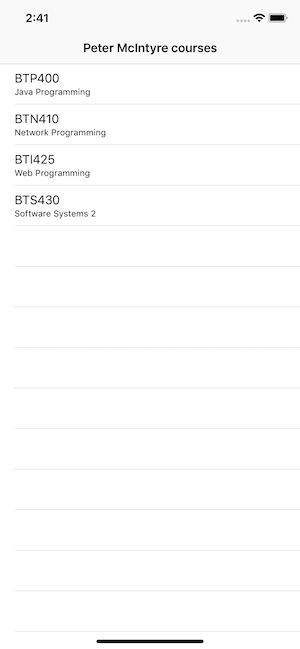
Table view controller
In the interaction essentials document, we introduced the UI object - table view. Follow those instructions to configure and run an app that displays some data on a list.
List of courses
From above, this second app will display a list of ten or more courses that you have had in 2019 (including this fall term). The data will come from a web API, and the app will support a small amount of user interaction.
To complete this part, you can do (or reproduce) the work we discussed during the Friday, September 13 class session. It was documented in the note titled Web API request, introduction, synchronous.
Create YOUR OWN data file
In it, ensure that YOUR NAME is entered
On the running app, make sure that your name is part of the table view’s title
One of the features that we want for this app is a two-line table view cell. How do we get that? Well, edit the main storyboard. Select/click the “Prototype Cells” on the table view controller. On the attributes inspector, in the top Table View Cell area, the Style should be set to “Subtitle”. Then, in code, the cell has a detail text label property that is the second line of the cell.
The “small amount of user interaction” will be really simple - if a user taps on a row, the iOS runtime will highlight the row (with a light grey background). Your task will be to detect that tap, and remove the highlight.
Testing your work
Test your work by running it on the simulator. Do this frequently and incrementally, after making any substantial changes.
Your professor plans to introduce you to the Xcode debugger soon, and that tool may help you troubleshoot problems.
Reminder about academic honesty
When you are ready to submit your work, you will copy some of the code in your project to plain text files, so that the My.Seneca/Blackboard “SafeAssign” tool can do its job. The next section will tell you which files to copy.
From the Blackboard web site:
SafeAssign compares submitted assignments against a set of academic papers to identify areas of overlap between the submitted assignment and existing works.
Submitting your work
Follow these instructions to submit your work, before the due date and time:
-
Locate your project folders in Finder (and we suggest that you make copies for yourself).
-
At the same level, create a new folder named “MyCode”.
-
From AllAboutMe, copy these source code files to the “MyCode” folder:
ViewController.swift
Main.storyboard
For each of these files, add a prefix “App1” to the name, and then change the file name extension to “txt”. -
From MyCourses, copy these source code files to the “MyCode” folder:
CourseList.swift
Main.storyboard
For each of these files, add a prefix “App2” to the name, and then change the file name extension to “txt”. -
Select all three folders:
AllAboutMe
MyCourses
MyCode
Right-click, and choose Compress 3 Items, which creates a zip file (make sure the zip file is fairly small, around 500KB or less). -
Login to Blackboard/My.Seneca, and in this course’s Assignments area, look for the upload link, and submit your work there.